
All artists will work differently but following is the process I usually use in designing my linoprints.
Basically the process that I have for designing new linoprints involves a lot of pre-designing ‘thinking’. I take all my own source photos so the first step involves taking many photos of the subject in all its different aspects. With a busy life I have little time to spend ‘on-site’ and usually I have family following or waiting nearby. (“Are you finished yet mum?”)
In the past ‘pre-digital’ times all this photography has meant lots of money on film processing and printing (I have a rather large collection of filed photographs) but with digital I have the luxury of saving the images to disk and printing as I need them.
The next step is the ‘thinking’ and looking at the images I could possibly use – doing some small sketches of individual plants. I sometimes grow specific plants or buy them to work from also. I then may do a series of small quick and usually ‘scrappy’ sketches of compositional ideas with written notes…
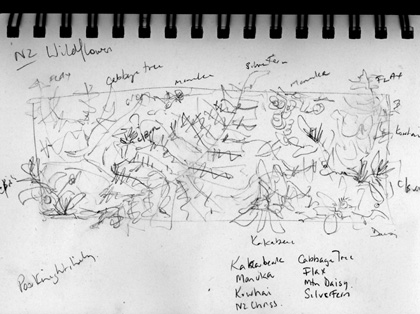
I then set about translating these ideas into a design – as with in the case of the NZ Wildflower design – I look at a selection of possible wildflowers/plants I could use and lightly sketch these up into the basic format/design layout. I then make a detailed drawing of the design. In this process the overall design layout and which wildflowers/plants I end up using may completely change or change position. I’ll assess not only what I consider the importance of each flower/foilage within the overall design concept but also their individual shape, size and colour and their effects on the overall design.
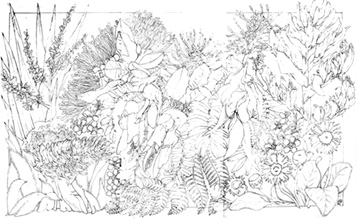
The final drawn design for the NZ Wildflower design looks like this…
I’ll spend some more time thinking… adjusting… and assessing… the overall concept and drawing….
I then photocopy this pencil drawing – at this point I may also change the overall size (larger or smaller) – again this is part of the overall processing and thinking about the development of the final design. I then ink in the black areas of the design on the photocopy. I use this process for a number of reasons – it gives me time to think about the overall design and make adjustments as I go but mostly it means I have a black and white ‘template’ to use to carve the lino. I notoriously used to cut the wrong areas – particularly with the more intricate work and I now find that I rarely have this problem. So the final design phase ends up looking like this…..

Then more thinking… changing… and assessing…I’ll ‘live’ with this design for a while….
Finally I’ll transfer my final design image in reverse onto the lino and start carving.

I am an painter who wants to do relief printmaking and while hunting for info I found your site which I find both facinating and informative. I hope to start working with Linoleum as an intro to relief prints. Best wishes ASW
Hello Audley, I’m glad you have enjoyed my site – I hope the info helps! kind regards Lyn
beautiful lino prints, Lyn! Such a great idea to transfer the drawing first, so you don’t slice off the wrong bits. . .that’s so frustrating! Your work has inspired me to get out my materials and start carving, thanks so much. Kathy
Hi Kathy,
I’m pretty pedantic with the designing so this way I am able to work on the design and make adjustments on the paper rather than on the actual lino block. That being said many artists like the spontaneity of working directly onto the lino and working around any mishaps or mistakes. They are just different ways of working.
Glad you’re getting those lino carving tools out again!!
kind regards
Lyn
What a good idea…… the photocopy of the sketch and the black ink. I must try this. Your work is beautiful and very inspiring.
Thank you.
Hello Helle – it makes life easier with type of template approach – I make less carving mistakes! Thankyou for your kind comments about my work!
Hi, I’m new to carving. How do you go about transferring your final design onto the lino – i’m a bit confused by this.
Cheers
Erin
Hi Erin,
Sorry it has taken a while to get back to you. I use the ‘old fashioned’ way of transferring the image to lino. I trace the design onto that transparent kitchen paper – not the waxy greaseproof onte. I then tape this to the lino and rub over the back of the tracing to transfer the image. I remember this is what we did at school a LONG time ago! Because you need to carve the image in reverse so that when you print the design it comes out the right way I find this is way of transferring works for me. Others use carbon paper after reversing the image and i am sure there are many other ways.
Lyn, What is a recommended ink or medium in the drawing process so that the transferring to lino will come out clearly? –
Hi Mark – I simply use a 3B pencil on tracing paper and rub over the back – this transfers it in reverse as well. I thought I had posted something about this process but seem to not have! I will do this soon!
Lyn
Hi Lyn
Thank you putting this up,Im just starting a BA and in the printing phase where Im trying to get out of my square so to speak,the info you have here is wonderful and Im going to put it into practise for my assignment,only using black at moment,too far from shops here,Kambalda WA.Thank you again for the inspiration
Cath
Hi Cath, I am glad my info is coming into good use! Nothing wrong with just printing with black – although I have done some colour work I prefer to print the black and handcolour. I love being able to combine painting as well as printing and I can get the graded colourwork I want for the effect I am looking for.
Aahh Western Australia – my longed for dream is to visit the WA wildflowers – one day I might get there!! I will check out your blog as well!
Lyn
Oh Cath so jealous!! Just found out where Kambalda WA is!! Wildflowers – and you have a blog about the wildflowers – excellent!! Will add it to my list of links!!
Lyn